Planting Trees:

TREES FOR OAKLAND
  • Home
  • About Us
    • History
  • How to Get a Tree
  • Volunteering
  • Donate
  • Tree Care
  • Help us spread the word!
  • Job Openings
  • FAQs
  • Benefits of Trees!
  • Press
  • Our Media
  • Friends & Resources

How Do We Plant Our Trees?

There are many ways one can plant a tree. This is the way that we do it.  We aim to have 2-3 people working at each tree.

Tools & Materials:

Digging Tools:
  • 1 round-nosed shovel per person
  • 1 square-nosed shovel per crew
  • 1 pick or pick-mattock per crew
Clean-up Tools:
  • 1 tarp or sheet per crew
  • 1 broom per crew
  • Wire brush
Pruning Tools:
  • 1 hand pruner
  • 1 folding hand-saw
​Dressing the Tree:
  • 1  5-gallon bucket of compost per 5 trees
  • 2  15-gallon buckets of mulch (wood chips) per tree
Safety:
  • Orange safety cones for the street (optional)
Steel Staking System (Option A):
  • 1 9-foot steel stake per tree
  • 1 L-bar per tree
  • 1 crossbar, rubber strap, & nut-bolt-washer attachment system per tree
  • 1 adjustable wrench per crew
... or Wooden Staking System (Option B):
  • 3 wooden stakes per tree
  • 3 cross-braces and 12 nails per tree
  • soft strapping and nails, as needed, to brace the tree
  • 1 stake-pounder per crew
  • 1 hammer per crew

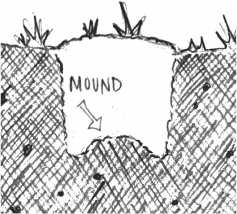
Step 1 - Prepare the hole:

  • The sidewalk will be marked with a white bull's eye, dot, stripe, or other mark - indicating where the center of the tree will go.
  • Lay a tarp down beside the hole to keep the sidewalk clean.
Picture
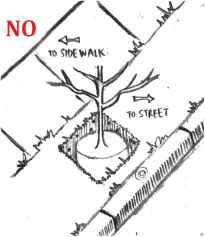
Using a round-nosed shovel, dig a 3' x 3' square hole.
  • Sometimes the soil will be too hard for a shovel. When that is the case, use a pick-mattock to loosen, then shovel the loose soil out, and repeat.
  • When digging, you may notice the soil changing as you go deeper (in color, in texture, etc.) - try to keep the different layers of soil separate (see step 3).
  • Dig the hole as deep as the tree is in the nursery pot - up to its root crown.  The root crown = the base of the trunk, where it starts to flare out towards the roots.
  • Make sure not to compact the side walls of the hole - keep them scored or loose to encourage the roots to grow out to the sides.
  • Form a little mound at the base of the hole.  You can do this by digging a deeper ring around the bottom OR by digging the entire hole a little deeper and then filling the middle back in with some soil and tamping it firm.
  • Try not to dig any deeper, because you want a stable foundation for the tree.
  • To check the depth of the hole:
    • Lay down a shovel (or stick) across the opening.
    • Invert another shovel into the hole and use your fingers to mark the depth.
    • Compare the depth of the hole to depth of the nursery pot.
Picture
Picture
Picture
Picture

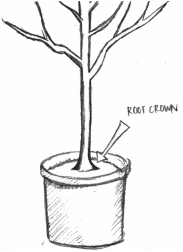
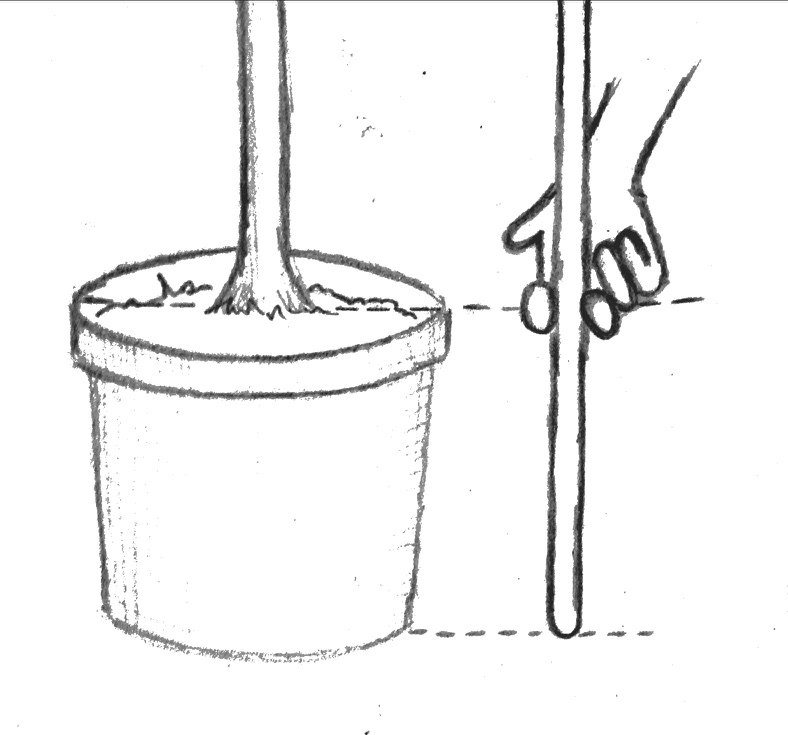
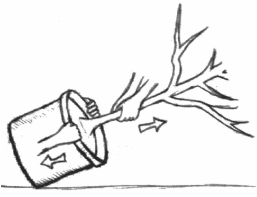
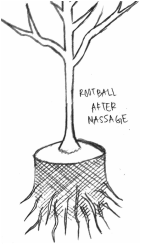
Step 2 - Prepare the tree for planting:

  • Smack the sides of the nursery pot with the back of a shovel, to dislodge the root-ball. 
  • Slide the tree out of the pot:
    • Tilt the tree to one side - almost completely on its side.
    • One person holds onto the lip of the pot.
    • Another person holds the base of the trunk and gently pulls the tree out. 
  • After the tree is out of the pot, cut off the circling roots and encourage a stronger outward growth of roots.
    • If there are roots encircling the root-ball, cut them away with pruners or use the serrated edge of a saw.  Cut off any angles or kinks that occurred when the tip of the root hit the inner wall of the nursery container, and then turned aside.
    • Do the same for roots at the bottom of the rootball: you can cut off the whole bottom disc ("pizza pie") if there is a matted mass of roots. 
    • No need to hold back!  As much 1/3 of the roots can be removed without causing long-lasting harm to the tree.  Trees will recover fast from aggressive root-pruning.
Picture
Picture
Picture

Step 3 - Plant the tree:

  • Sometimes, the branches will be wrapped up with twine for easier transport.  In these cases, remove the twine to free the branches.
  • Put the tree into the hole on top of the mound. 
    • When doing this, try to hold the rootball rather than the trunk to prevent damage.
  • Make sure that the root crown is at the soil line, or as much as 1" above it.
    • Above the surrounding soil is OK - as the tree grows, it may settle and sink further down.
    • We don't want the root crown to be below the soil line, as the tree may rot if the root crown is covered with soil.
  • Check the orientation of the tree:
    • Branches should not reach out toward pedestrians or toward cars.
    • Orient the branches parallel to the sidewalk.
    • If there are predominant winds - angle the tree slightly into the winds. As the winds blow, it will push the tree into the right position.  Generally the winds in Oakland come from the west or southwest (off the bay), but pay attention to the microclimate at your specific location.
  • Back-fill the hole halfway:
    • ​​Remember when you kept the different types of materials separate when digging? Fill the soil back in,  in the same order in which it was dug out - keeping similar backfill next to similar native soil.
  • We do not mix compost into the backfill.  If the roots were growing in "amended" backfill (mixed with compost), they would tend to turn away when they reach the boundary with the "unamended" native soil.  We don't want that to happen. The roots should just grow in unamended native soil.
  • It helps to have someone stabilizing the tree as it is filled​​, and double-checking to make sure the tree hasn't moved during the filling process.
  • Give the tree its first water.  Water in the half-filled hole with about 5 gallons, to allow the soil to settle and to eliminate air pockets.
  • Double-check the orientation and make sure the tree is standing upright.
  • Continue filling the hole with soil until it is full.
  • See below (Step 5) for what to do about the extra soil.
Picture
Picture

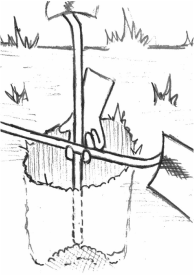
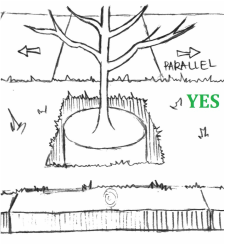
Step 4 - Add stake(s):

  • If the trunk is tied to a nursery stake (wooden or bamboo), cut away any the tapes and see whether the trunk can hold itself upright.  Sometimes the trunk is too flexible and cannot stay vertical, so you should reuse one of the tapes to loosely tie the trunk back to the nursery stake.  But if the tree stays upright without the nursery stake, then pull the nursery stake up out of the rootball and fill the hole with soil.
  • If you are using 3 wooden stakes, you will place them in a triangle formation around the tree.  Be careful when using a stake-pounder to drive the wooden stakes into the ground; don't let the stake-pounder slip off the top and hit you!  Follow up by attaching 3 cross-braces (if you have 3 stakes), and rubber straps (for 2 or 3 stakes) to hold the tree upright but not too tightly.  GO TO STEP 5.
  • If you are using one steel stake with a screw-tip,  place it on the side of the tree where the prevailing winds are coming from - usually this is the west or south (downhill, off the bay). 
  • Position it halfway between the street and the sidewalk to keep it as far away from either as possible.
  • Measure where the stake should be using the metal cross-bar.
  • Screw the stake into the ground.  Drive it low enough into the ground that you wouldn't be able to turn it or pull it out by hand.  Then using the L-bar, turn the stake into the soil to the depth marked on the bottom of the stake -- usually around 2' in the ground and 7' out of the ground.  Start it manually with a few turns.
  • Many stakes have a welded-on tab at this position.   If there is a welded-on tab, stick the L-bar through the hole in the tab, to prevent the stake from rotating.
  • Attach the cross-bar to the stake.  
    • ​Place the looped end of the cross-bar over the top of the stake.
    • Using a wrench, tighten the bolts that hold the cross-bar to the stake. 
    • Set its height so the cross-bar sits below the lowest branch on the tree, but at least 4' above the ground.  If the lowest branch is lower than that, or if the tree is top-heavy, find a spot higher up the trunk between 2 branches.
​Attach the rubber strap:
  • Wrap the rubber strap around the tree and affix it to the cross-bar with the bolts, washers, and nuts.
  • Use the largest loop that still holds the tree upright.
  • The strap should go around the the young tree to give it support, but it should be loose enough to still allow the tree to move slightly in the wind.  As the tree sways in the wind, it will strengthen its fibers and its roots to anchor itself better.
  • Make sure to have the washers between the bolt-head and the strap, and between the nut and the strap. This helps distribute the force of the fasteners.
Picture

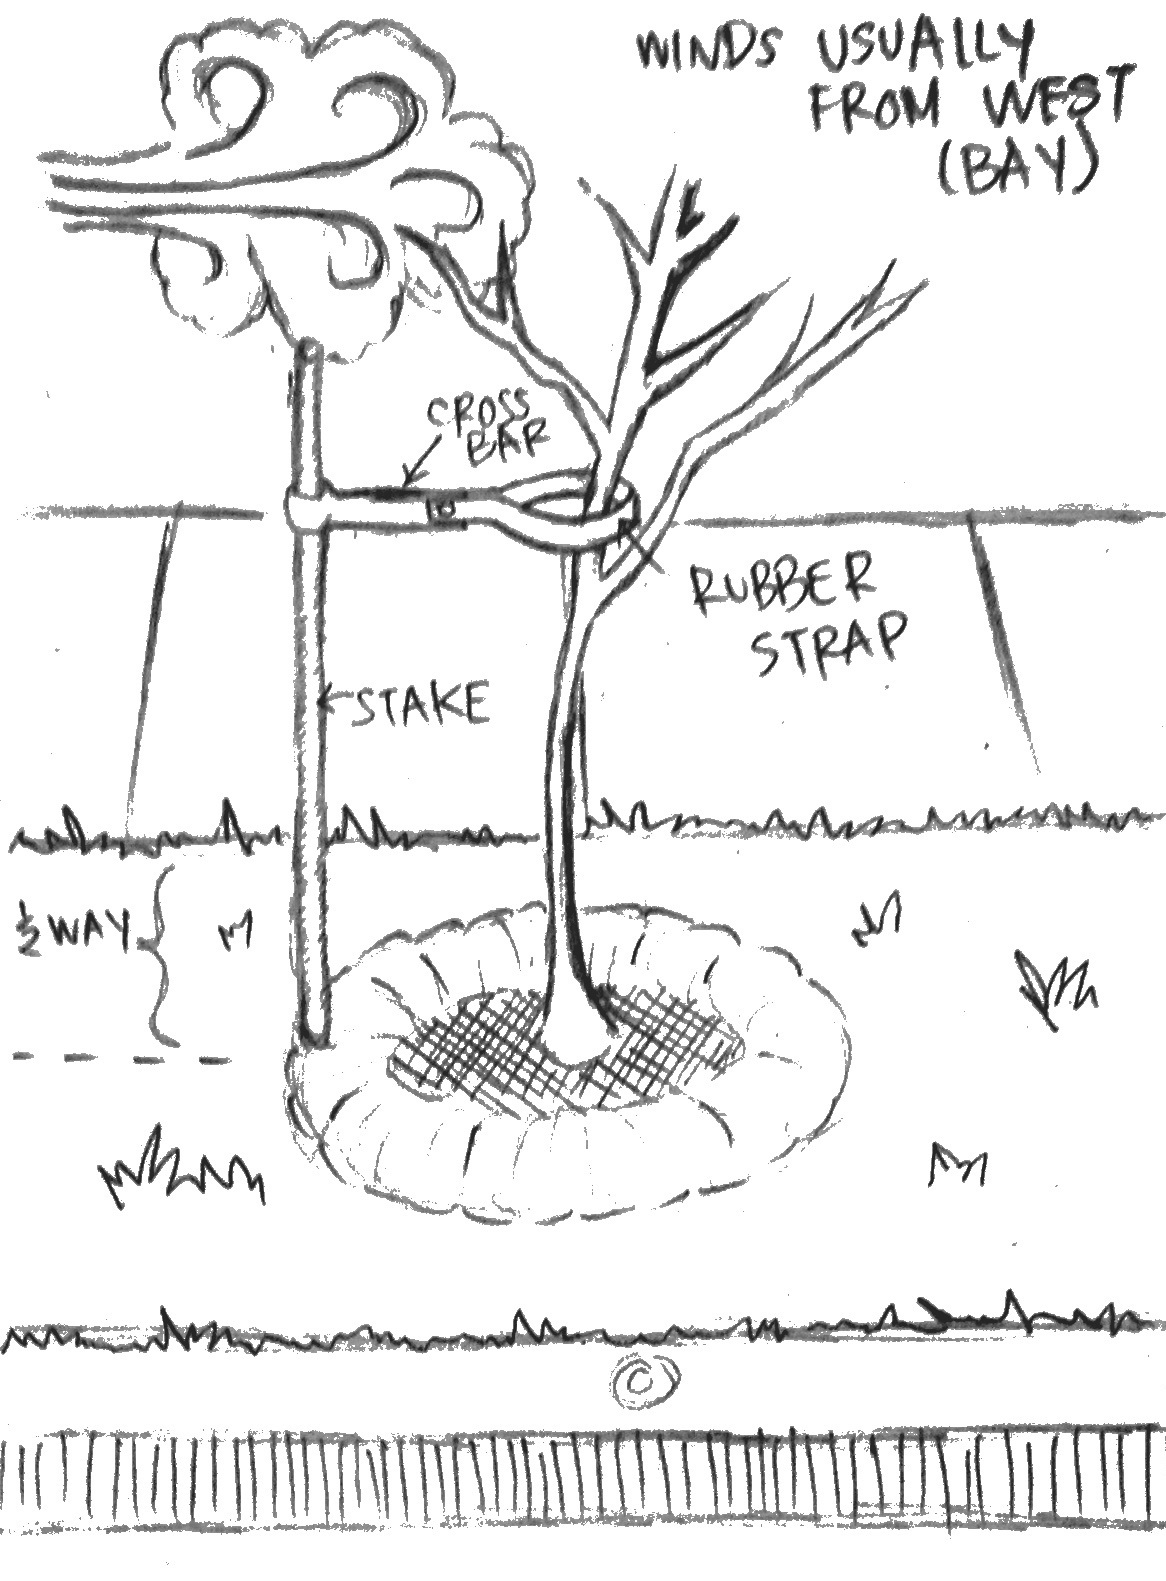
Step 5 - Form the watering berm:

  • Use the excess soil to form the watering berm: a raised ring (like a donut or a volcano) around the tree, about 15" to 18" away from the trunk. 
  • Leave a slightly lower ring, like a moat at a castle, between the rootball and the watering berm.
  • If the tree well is on a slope, form the berm into a "U" on the lower side of the tree, open to the uphill side - to hold water so it cannot runoff.   Leave a low area on the uphill side.
Picture
Picture

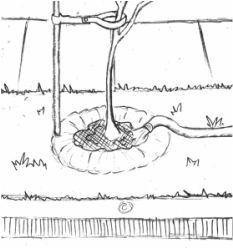
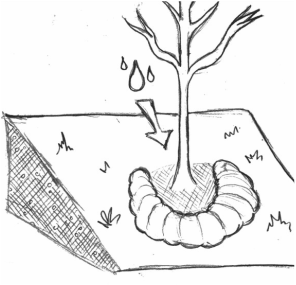
Step 6 - Water the tree:

  • Completely saturate the rootball and the backfill with a total of 10 to 15 gallons of water.
  • As water percolates down, you might see the soil collapse into air pockets below.  Adjust the soil to level out these holes.
Picture

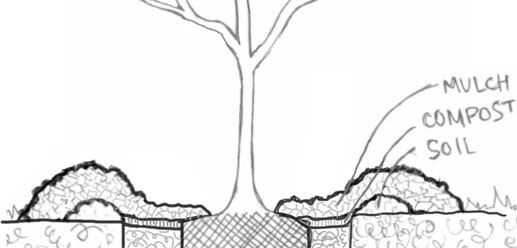
Step 7 - Add compost and mulch:
  • Sprinkle a few handfuls of compost around the tree, over the rootball and the ring of soil inside the watering berm.  We put the compost on top, rather than mixing it into the backfill, but you can gently incorporate the compost into the upper few inches of soil if you like.
  • Add one or two 15-gallon containers of mulch (wood chips).  Dump the wood chips all around the tree. Use enough to cover the compost, watering berm, and any other bare soil.  Then smooth it with your gloved hands, as though you were icing a cake.  The mulch helps retain moisture in the soil, insulates the soil under the hot sun, deprives weeds of light, and slowly breaks down to provide organic material to the soil.  You should expect to need more mulch every year, as the old mulch breaks down or blows away.
  • Do not pile up any new soil, compost, or mulch against the root crown (base of the trunk).  Just brush away these materials to keep the root crown dry and exposed to light and air.

Step 8 - Clean up:

  • For pedestrian safety, the height of the material in the planting strip should be level with the surrounding pavement.  Back-fill the opened ground with soil or mulch until it is flush with the walkway.
  • Return all nursery pots, as well as the tarp, tools, picked-up trash, etc. to the truck to return to headquarters.  Nothing should remain at the site except the newly planted tree - staked, composted, mulched, and watered.
  • Sweep the sidewalk of any residual soil.  Sweep soil onto the planting strip, not the gutter or street.  A square-nosed shovel is good for scraping soil off the sidewalk, followed by the broom for a final clean-up.

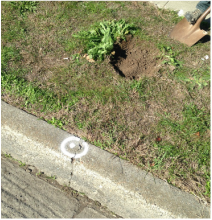
Step 9 - Take a picture!

Celebrate all of your hard work with a picture! Please send it to us so we can share it with the world that you just helped make Oakland a little greener and a little cleaner.  ;)

NOTE:  We are updating our PDF to match these new instructions, but you will soon be able to download full guide as a PDF here.
Contact Us
Like us on Facebook
 
Picture
in partnership with:
Picture
Picture
Picture
  • Home
  • About Us
    • History
  • How to Get a Tree
  • Volunteering
  • Donate
  • Tree Care
  • Help us spread the word!
  • Job Openings
  • FAQs
  • Benefits of Trees!
  • Press
  • Our Media
  • Friends & Resources